There are three parts to SEO, on-page SEO, off-page SEO and technical SEO.
Technical SEO involves all the things you’d do to make sure the search engines can crawl and index your site.
There are lots of things to do to win on the technical side of things and here are some of them:
1. Get A Sitemap Installed
A sitemap is a file that contains the list of URLs on your site that the search engines can crawl.
There are no negatives to getting a sitemap installed, it can only improve your SEO especially if your site isn’t well structured.
If you have a new site and you’re having problems with indexing many of your pages, you can submit a sitemap to Google to help with that.
If you’re on WordPress, you can create a sitemap with plugins from the directory or you can just manually create an XML file on any platform your website is developed on.
How To Submit A Sitemap
To submit a sitemap, go to your Search Console homepage and click add sitemap.
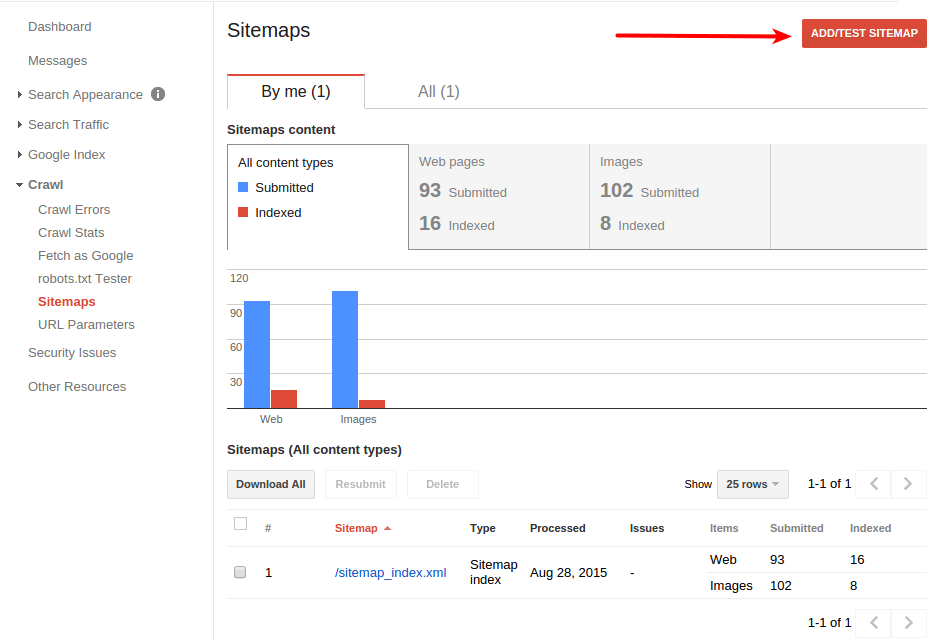
If you’ve successfully created a sitemap, it should come up when you type sitemap.xml into the space provided.
Click submit and that’s it, you can confirm yourself if the sitemap has all the URLs you need to be crawled by clicking on the expand icon next to it.
If you’re hosting images on your site, you can create image and video sitemaps too.
People do lots of image searches on Google so an image sitemap provides the search engine with additional information on what that image is about.
So if you have an infographic on on-page SEO, you can rank that infographic for the image search about the keyword even without an image sitemap, but an image sitemap would boost your chances.
And you can create video sitemaps too, you won’t need a sitemap for hosting your video on YouTube because it’ll be indexed anyway and the description section for YouTube videos is enough to explain what your video is about.
But if you’re hosting videos on your site, a video sitemap should help you rank for your target keyword, you can see how to submit one to Google here.
2. Implement A Proper Linking Structure
There are two types of links on your site, the first is an external link which points to a domain different from yours and then an internal link which points to other pages on your site.
External links help you build relationships with new bloggers.
So they can hop on your site, look at content you’ve written and also link to your site from theirs.
For your external links, there are a few rules you should live by.
Make sure you’re not participating in linking schemes that attempt to influence page rank, only link to an external resource if it complements the content on your page.
That’s called natural outbound linking.
Regularly scan your site for broken links to ensure you’re not linking to pages that haven’t been updated in ages.
Too many broken links on your pages send a signal to Google that you’re not updating your content and that’s not good if you want to remain in the top positions.
And for pages with affiliate content which you don’t intend passing link juice to, implement the nofollow tag on your links.
Most search engines are aware of most affiliate companies and don’t pass page rank but if it’s a new company, you should do that to be on the safe side.
For your internal links, use your complete control over them in an effective way.
Internal Link Siloing
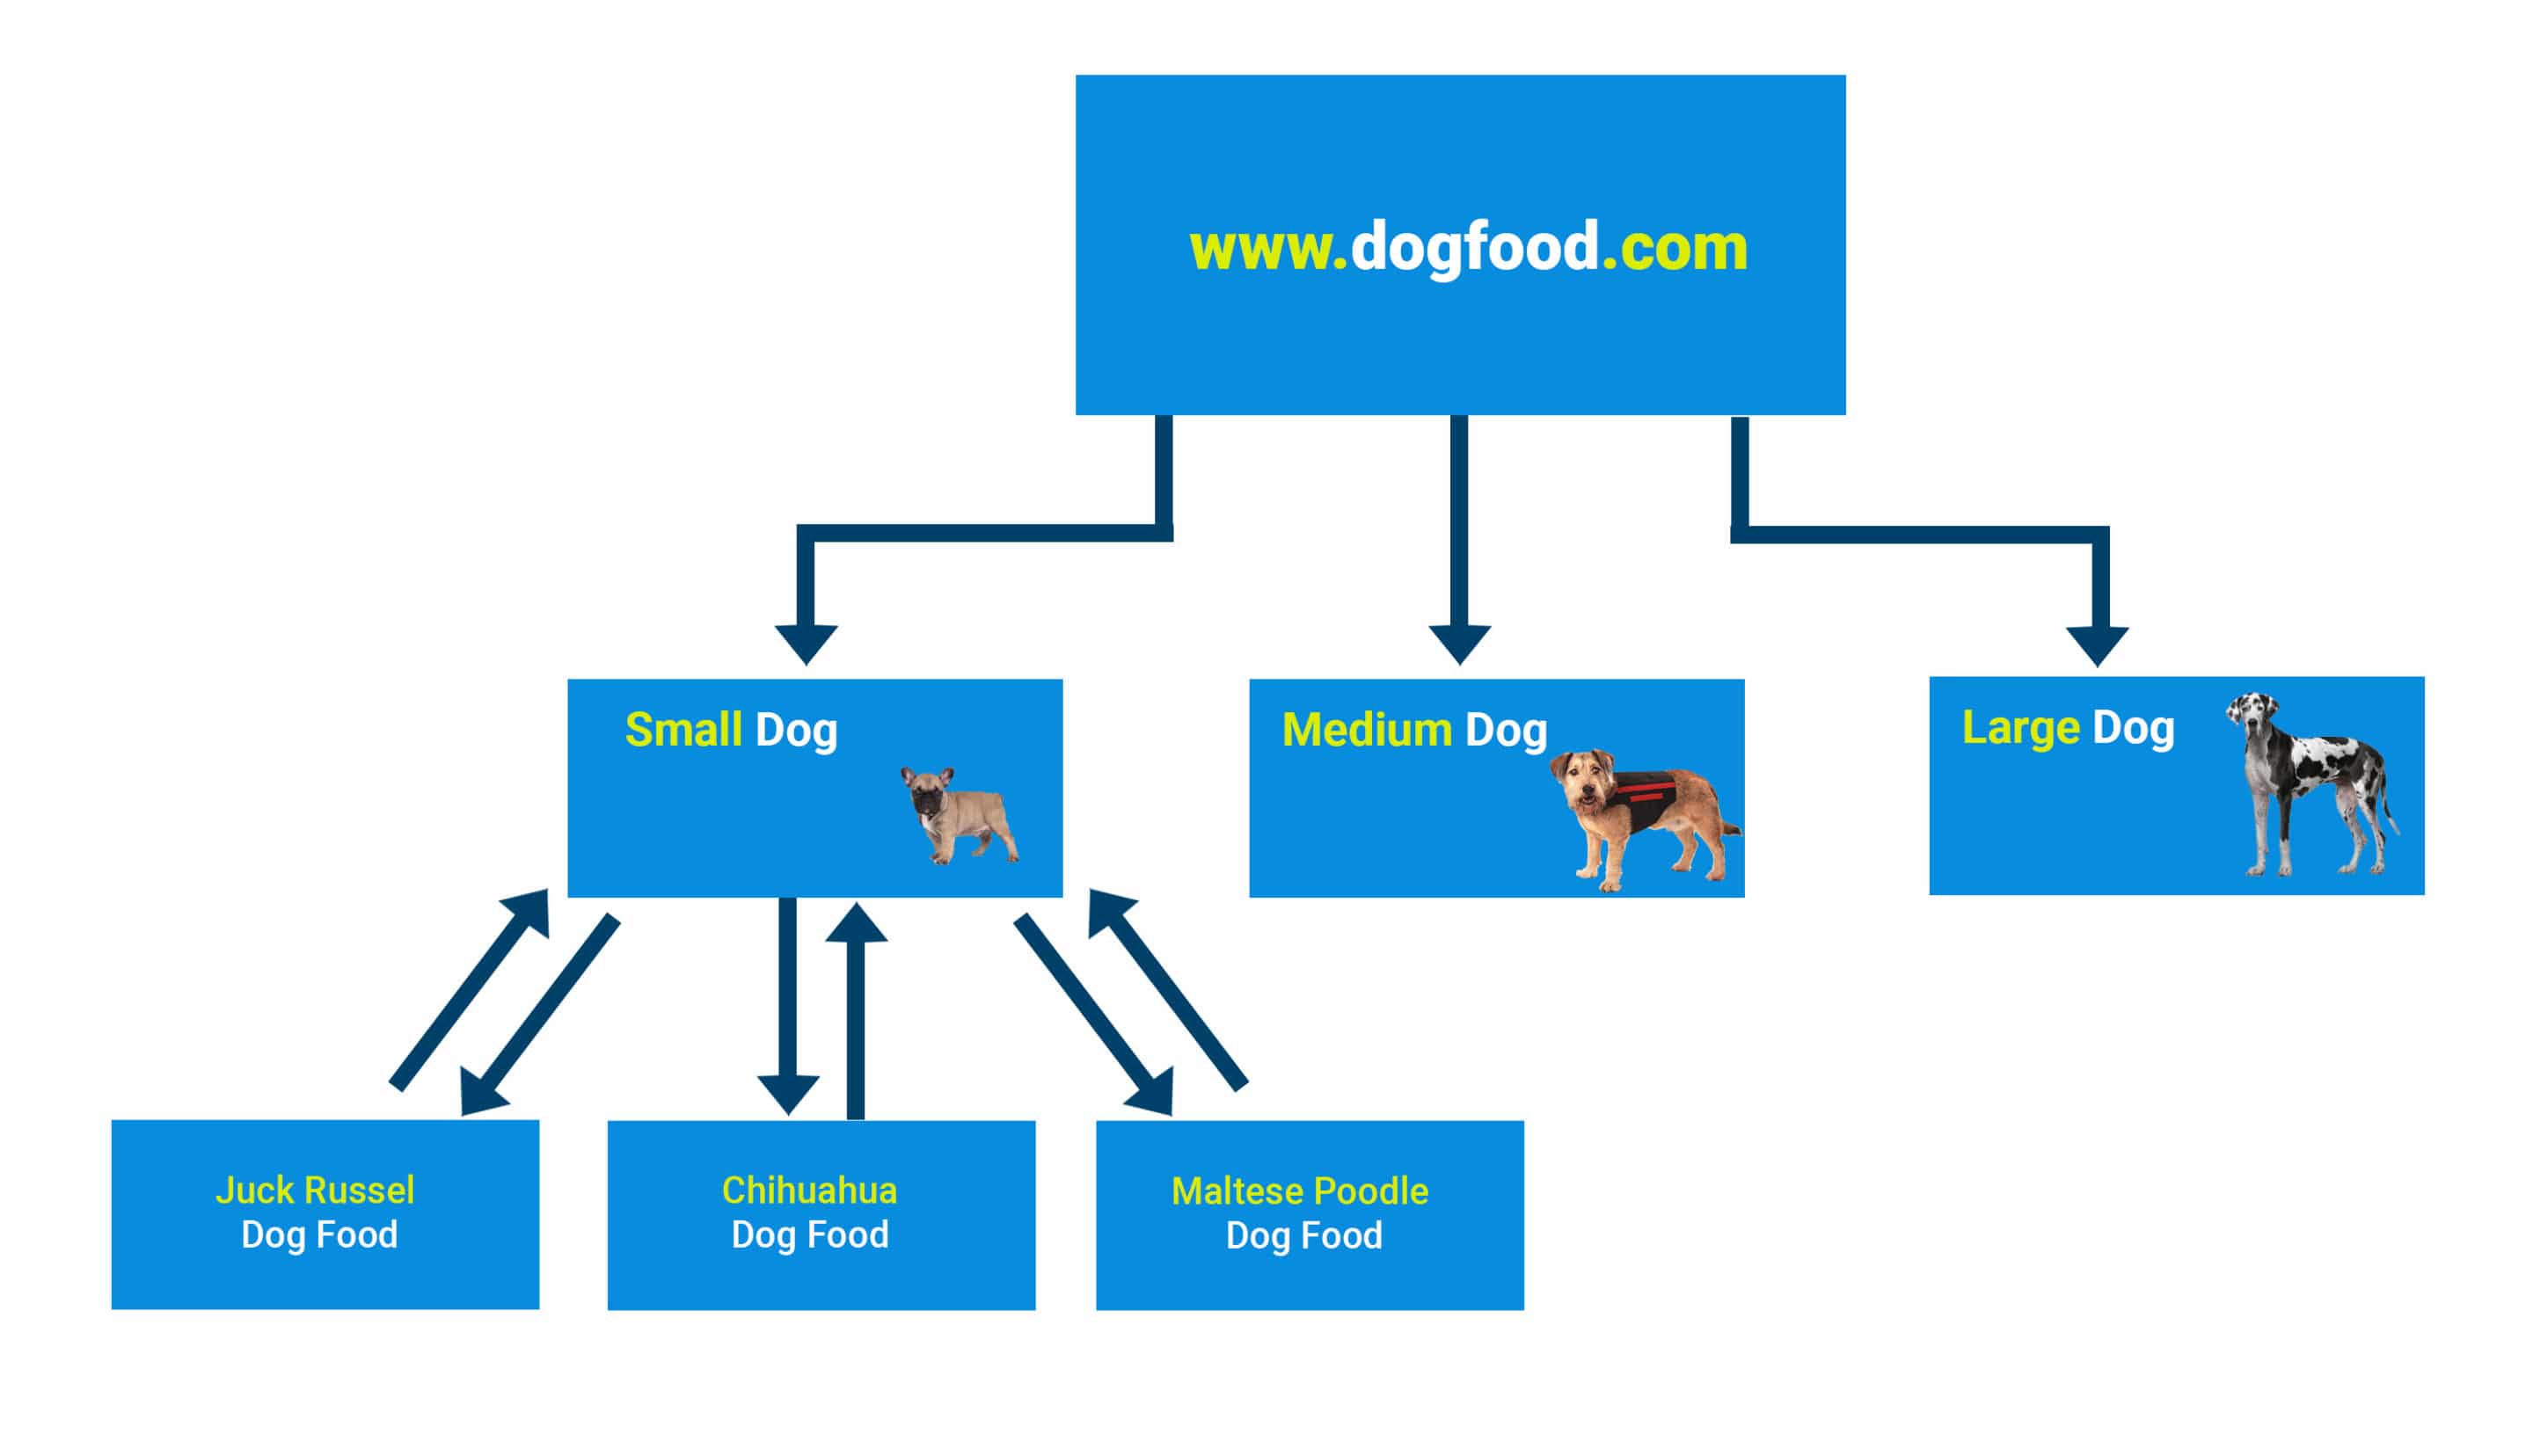
Build silos with your internal links. Siloing means grouping related pages together to push up rankings for all the pages in the silo.
So a page on on-page SEO passes link juice to another on off-page SEO which sends same to a page on technical SEO.
With this structure, big G begins to view your site as a massive resource on SEO.
And when faced with a subfolder vs subdomain link structure choice, go with a subfolder.
A subfolder looks like “pets.com/dogs” and a subdomain looks like “dogs.pets.com.”
With a subfolder, link juice flows from the main domain to the internal page but with a subdomain, Google treats this like a stand-alone domain so you don’t get that flow of link juice.
3. Use Your Tags
There are too many wrong things people are doing with their tags and it’s hurting their SEO.
And I’m talking about the title tags, the alt tag and the URL tag also called the permalink extension.
There are six title tags, numbered H1-H6.
H1 is the primary tag and it just makes sense that your keyword should be enclosed in this tag.
I mean, you can’t write an article on the benefits of coconut water without using the word coconut, right?
Your H2-H6 tags should be explainer tags, tags that have the long-tail variations of the main keyword.
So if your target keyword is “benefits of coconut water,” you can write on “benefits of coconut water for skin” under your H2 tag.
And your H3 should be something like “how coconut water helps dry skin during winter.”
Each minor headline tag should explain a little aspect of the topic so the site would be considered an authority on that topic.
The alt tag helps to describe your image to the search engines.
It helps the image rank higher for the descriptive text and screen readers would read out this text to visually impaired readers that are doing an image search.
4. Permalinks
And then you have permalinks. A permalink is an address used to link your pages.
So look at the links “https://pets.com/?_+2-post” and “https://pets.com/dog-food” Both links represent pages that talk about dog food and the permalinks for both are “?_+2-post” for the first and “dog-food” for the second.
A good permalink is one that’s short, readable and descriptive.
A permalink should be short because that provides a cleaner URL structure.
It should also be readable and descriptive because that improves your click-through-rate when someone’s looking at it on the SERPs.
The “dog-food” permalink makes it clear to everyone that the page has content on dog food but the first permalink doesn’t say anything about its content.
5. Look At How The Spiders Crawl Your Site
Every site has something called a crawl budget. Or at least the sites that have been submitted to the search engines.
Crawl budget is the number of pages Google will crawl on your site in a day.
When Google crawls your site, it looks for new pages it can add to its index and if you’ve updated your old pages since the last crawl it updates that information on the index too.
But sometimes Google finds it difficult crawling your site and you’ll experience crawl errors.
There are many crawl errors but there are ways to solve them too.
Server Errors
Server errors are one of them. They occur when your site is taking too long to load so the Googlebot gives up and moves to other sites.
To check if your site is experiencing a server error, use the “Fetch as Google” function in Google Search Console, if your homepage is displayed after doing this, it’s clear that Google is able to access your site.
To avoid this error, get on a good host that can cater for the traffic your site receives and accommodate spikes on some days.
404 Errors
404 errors are another type of crawl errors.
They come up when you or other webmasters link to an internal page that doesn’t exist or used to exist.
Google tries to crawl that page since it’s indexed and it’s not available.
If it’s a page that used to exist, you can simply redirect it to another page, if it’s one that never existed and never linked to from anywhere you can forget about it ‘cause it won’t show up in your crawl errors report anyway but you should have a custom 404 page with a search bar to direct users to the right content.
Robots.txt
And you should also check your robots.txt file to ensure you’re not denying Google access to relevant pages on your site or the entire site.
This normally returns an “Access denied” error if Google is blocked.
Pages that host free content and admin login pages should be blocked.
And check the WordPress settings panel to ensure you haven’t disallowed the search engines from crawling your site.
Fixing these and other crawl errors will ensure your crawl budget isn’t spent before the relevant pages have been crawled.
6. Get Your Site Secure
There’s only one search engine friendly way to get your site secure now, get an SSL certificate installed.
Google’s going to start declaring sites without the “secure” tag as not safe so if you’re buying a new domain, make sure you get one installed as you get hosting or if you already have an HTTP site, make the change to HTTPS.
SSL stands for Secure Sockets Layer and it ensures that data exchanged between web server and browser remain private.
SSL certificates are very important especially in sites that receive private information like credit card numbers and pins.
If you install an SSL certificate on a site with the HTTP marker you can redirect the old URL to the new HTTPS URL. So go get it done.
And you should also scan your site to ensure it’s not been hacked.
Hackers can include viral code on your site that displays shady ads and redirects some of your highly ranked pages.
You can do a site:your-domain search on Google to ensure pages you didn’t create haven’t been indexed on the server.
And get a security plugin installed on your WordPress site to prevent you from attempts like unauthorized access.
7. Install Only The Necessary And Trusted Plugins
Too many plugins installed on your site will increase your site load time.
That’s because of the bulky code some of them will contain.
Some plugins can also expose your site to hackers because they were developed by programmers who want to tamper with the security of sites the plugin is installed on.
You should look at the user ratings and reviews both on and off the plugin directory before installing a plugin to make sure you’re not exposing your site to shady developers.
And there are a few plugins that’d be considered necessary by a lot of bloggers.
Plugins To Install
The contact form plugin is one of them.
It designs an easily accessible contact form on your contact page so you won’t miss anything from people who want to reach you.
A backup plugin is another must-have.
In a period where a security breach can wipe off months of hard work on your site, you need these plugins to make sure you don’t lose files on your website.
A backup plugin comes in handy too when you’ve broken your site after messing with code.
You can simply upload the backup and restore.
Next on the list is an SEO plugin.
The SEO plugins you’ll need for your WordPress site would help with your on-page SEO optimization efforts. And, if you’re unsure about how to install such a plugin, there are plenty of professional WordPress support services available to consider.
Things like SEO titles and meta descriptions are a bit difficult to navigate if you’re coding them directly into your pages but an SEO plugin helps with that.
And most SEO plugins provide recommendations while you’re editing your posts so you can implement these recommendations and move higher in the search rankings.
A caching plugin is also very necessary.
Caching plugins help save a copy of a visited page on a visitor’s browser so when next they request for that page, it won’t need to be downloaded from the server again.
And then an optimizing plugin. There are so many things on a website that can use some optimization.
HTML, CSS and JavaScript files, images, videos and some widgets on your site can be unnecessarily bloated, you need an optimization plugin to ensure the lightest versions of these files are running on your site.
Other technical SEO techniques include implementing Google accelerated mobile pages (AMP) and removing flash on your site because it doesn’t load well on mobile.
Apply these tactics and see the positive changes it produces for your site.